In this post, I am going to explain how to implement cascading drop-down list in the Nintex Form.
I have two SharePoint lists one with Countries and one with States
Countries:
States List : Country is a lookup column to Countries list
Demo List : have country and state lookup fields created and customize the form using Nintex Form
Nintex Form: we will be getting all the countries and all the states from the below dropdown.
To get states based on the selection of country, we need to change the settings below.
click on the state lookup control settings. From filtering, choose “By a control’s value”, enter “Country” Manually in “Where field”, choose “CountryLookup” from “Filter by control” dropdown like below.
3. Now the state lookup will be populated based on the country lookup value selection.
Let’s look at how to create the corporate directory for SharePoint Search in this post. When we need to look for users across the entire firm, this will be helpful.
1. Copy the below HTML to the notepad and name it Item_Person_Custom.html
5. Add a new site page, add a content editor web part and map the HTML file from the library to have alphabets for a search like below.
6. Add search results web part, search text box web part, and refiners if you need them as well
7. For the Search Results web part, choose local people results in the change query setting
8. Under Display Templates settings, choose the people item(custom) as the display template
9. Under Refiners web part properties, choose the required refiners like below
10. Finally, Save and close the page. The page should look like below. You can customize the template as required in the associated HTML, Script, and display template code.
As you all know that SharePoint Modern Page doesn’t support any kind of Script or Content Editor web parts and it requires the knowledge of configuring and creating the SharePoint framework and Development Environment.
At times we may need to customize the CSS Styles/ Inject JavaScript.
You can follow this post to add React based Script Editor web part for both Modern and Classic SharePoint Pages.
All you need to do is
Clone, build, run, test and deploy the .sppkg file and reuse.
Please feel free to contact me if face any issues in configuring it.
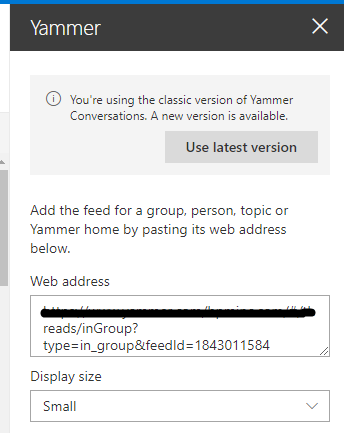
Hi I came across this issue that Yammer web part configured not working in IE Edge and IE Browser.
Try to trouble shoot by following these steps.
IE Edge:
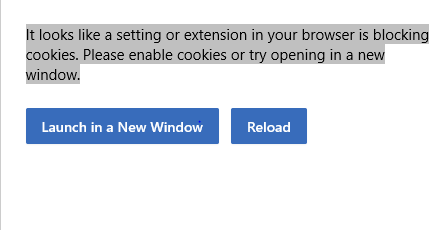
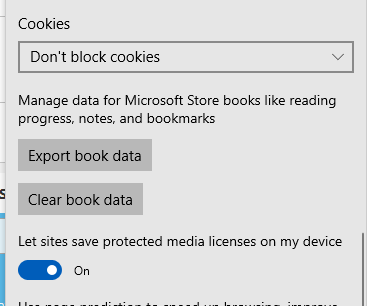
If you see this kind of message saying that “It looks like a setting or extension in your browser is blocking cookies. Please enable cookies or try opening in a new window” instead of loading/rendering the Yammer web part in SharePoint Modern Page, try to check the IE Edge settings.
Go to IE Edge Settings — Advanced Settings
Under Cookies – choose Don’t block cookies and try to refresh the browser.
This will load the Yammer Web Part. Also please try to login to Yammer Site in IE Edge if still asking you to Login to the site.
Yammer web part on SharePoint Modern Page has few limitations like using Yammer web part in latest view will not allow user to like or comment from inside SharePoint for which you need to switch to classic view from yammer web part properties.
In modern view of yammer, you cannot comment or like rather user will be redirected to Yammer Site, also image will be rendered as hyperlink/attachment.
Once posted user cannot have much edit options like changing/updating the image/modifying the image and customization for yammer web part in SharePoint Modern Page on any sort as The ability to change attachments (files and images) is not currently supported.
Hope Microsoft going forward provide various editing options for better end user experience. 🙂
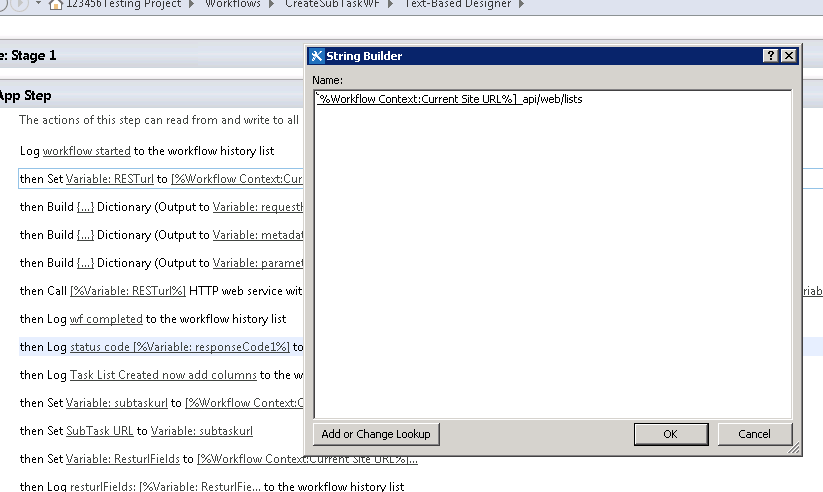
In this post, i will show how to call http/rest API using SharePoint Designer workflow to create new task List.
Open SharePoint Designer.
Create a workflow and add the below steps.
Set variable RESTUrl of type string with value as workflow context – current site url and append _api/web/lists.
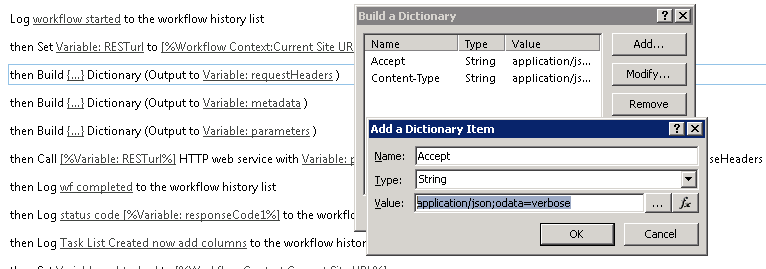
Build Dictionary, add two string variables(Accept – Type String – Value as application/json;odata=verbose) and Content-Type as another variable with type string and value as application/json;odata=verboseoutput to variable requestHeaders.
Add one more step, build dictionary, add variable name as type and type as String with value SP.List as below.output variable to metadata.
Add another Dictionary with variables below.output variable to parameters.
add variable like __metadata of type dictionary and choose workflow variable and choose variable metadata.
note: metadata variable should have two underscores, BaseTemplate as type Integer with value 107. In my case 107 is task list check for others if you want to create other list types, Description as type string and value as some description. Title as type string as per your need.
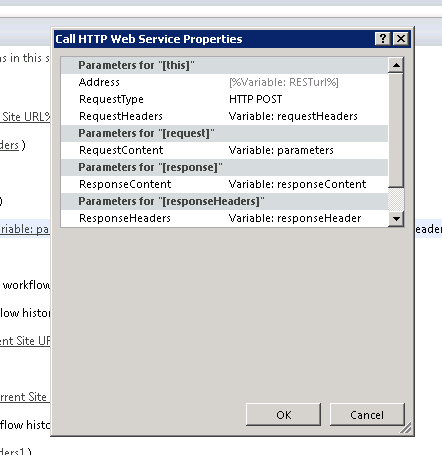
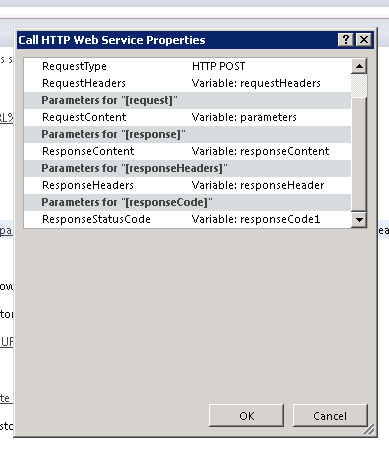
Add step call http web service as below and change the variable like below.
right click on the step and choose properties and change as needed. change request type to POST
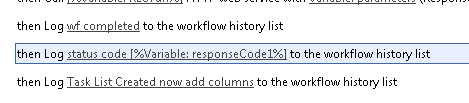
Log response code to see if any error comes out. Now trigger the workflow.
Make sure that you have enough permissions to run the workflow. if you face access related errors activate the feature workflow can use app permissions and register the workflow like below
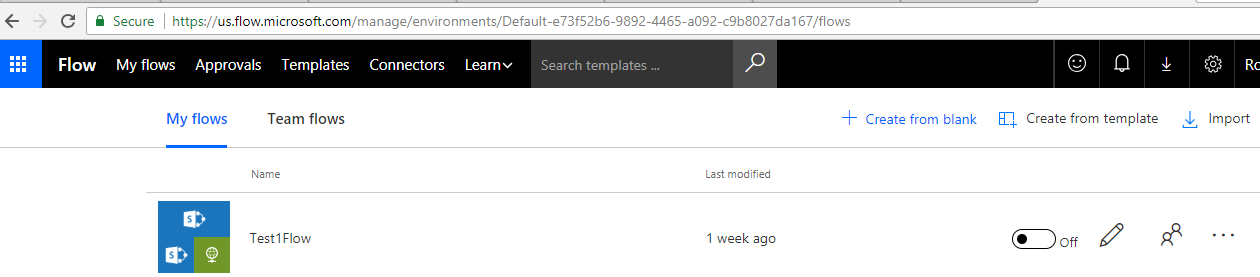
Microsoft Flow is a licensing tool which is used to automate the tasks and workflows.
In this post, as a beginner, I will tell you how to set item level permissions on SharePoint List and make it recurrence to run daily over a period of time.
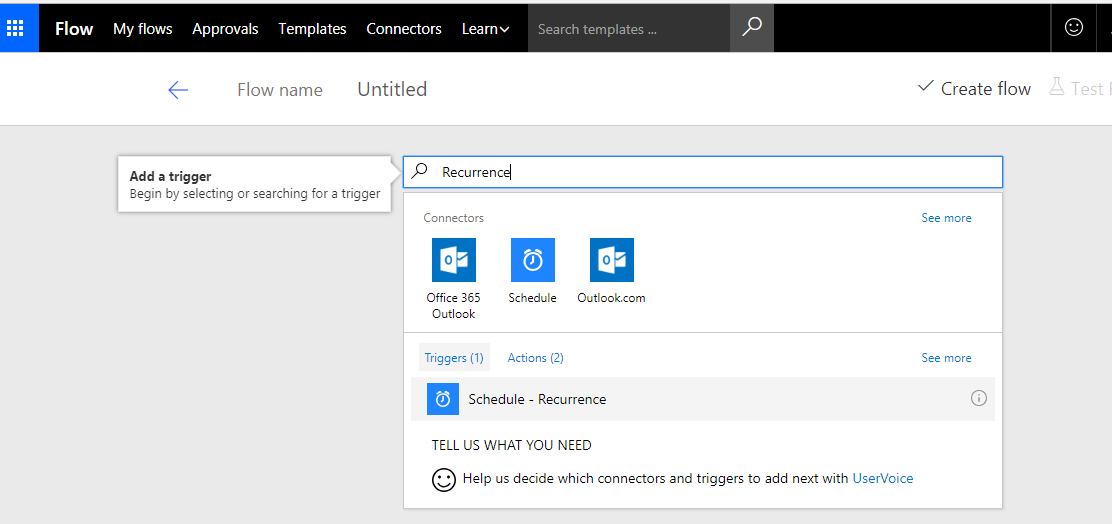
One of the most interesting feature is we can set recurrence/trigger the flow and make it run like a timer job to run/schedule sequence of steps where as using SharePoint Designer we cannot set the timer and need an action (add/edit) to execute the workflow.
I have a requirement for a SharePoint Tasks list items to lock down /set read only permissions over items based on date created. so, Lets start how to achieve this using Microsoft Flow.
search for Recurrence and add Schedule Recurrence step and name the flow.
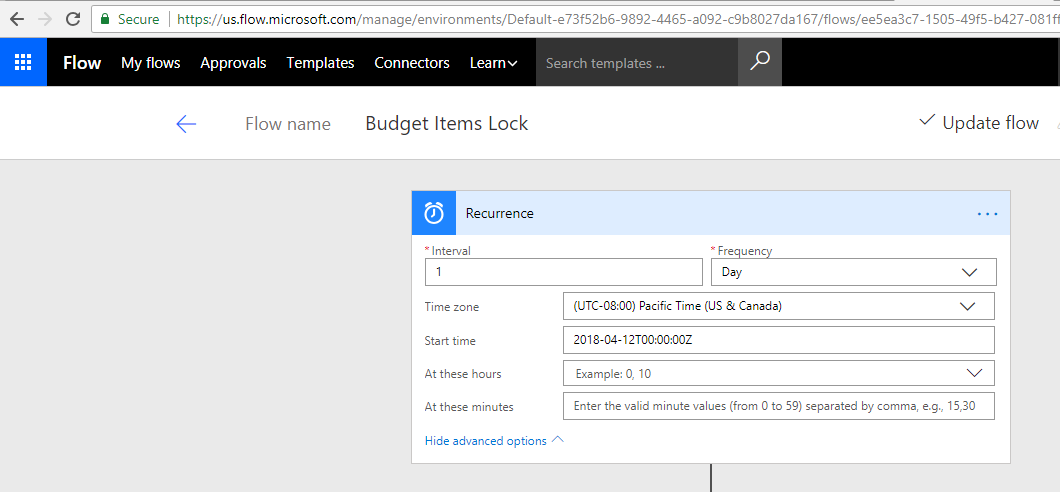
Add a schedule as per your need.
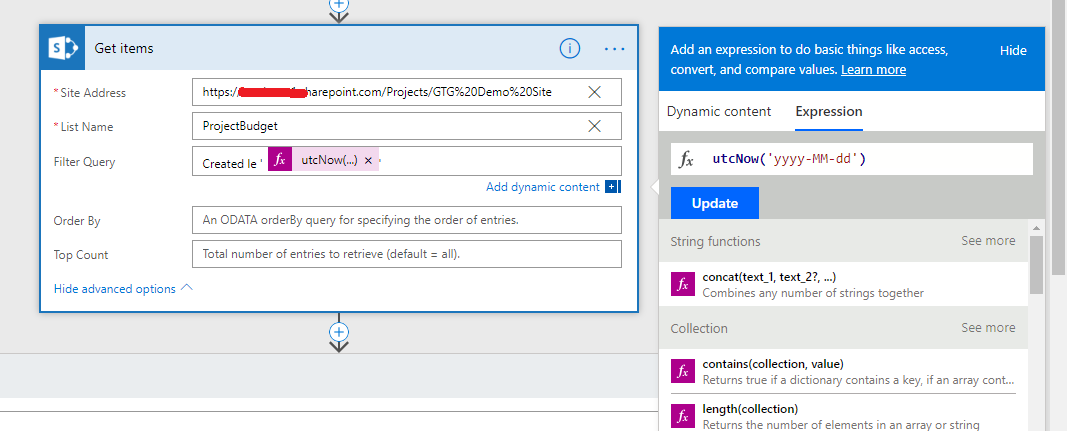
Add Get Items steps and provide the details below to get items from the SharePoint Site and List with optional Filter Query. In my case I just added Created date less than or equal to today date. you can still add more expressions/dynamic content.
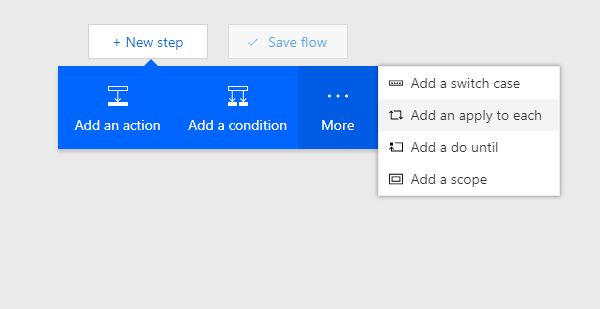
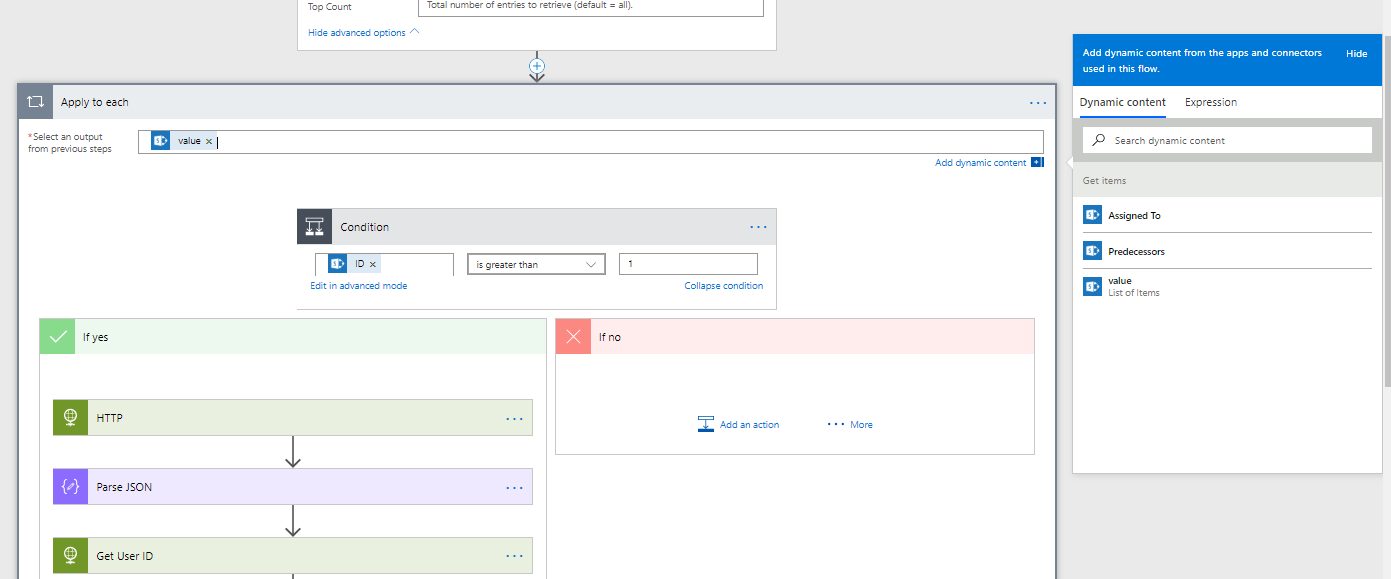
Add apply to each step by click more with ellipses button.
choose value as output and one condition in apply to each choose dynamic conditions if any as per your need. I have added ID is greater than 1 condition just for example.
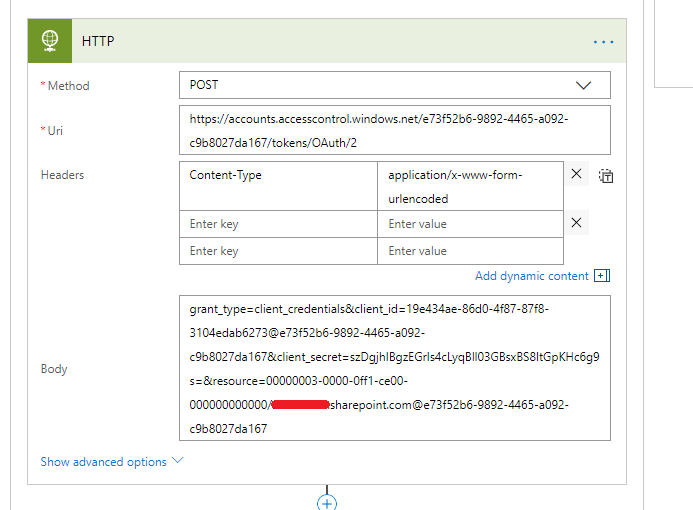
Under yes branch, add HTTP Condition. For this you need few parameters from the tenant along with App Registration.
Just follow this link for getting those parameters using PostMan.
After getting all the parameters,
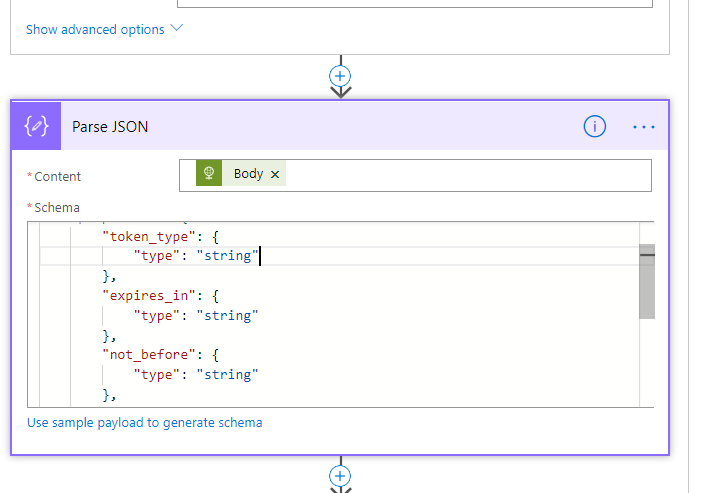
Parse the json code from the access token reply. Add this step. Choose the Data Operations action – Parse JSON. add the dynamic condition Body from the request
Copy this to schema.
{
"type": "object",
"properties": {
"token_type": {
"type": "string"
},
"expires_in": {
"type": "string"
},
"not_before": {
"type": "string"
},
"expires_on": {
"type": "string"
},
"resource": {
"type": "string"
},
"access_token": {
"type": "string"
}
}
}
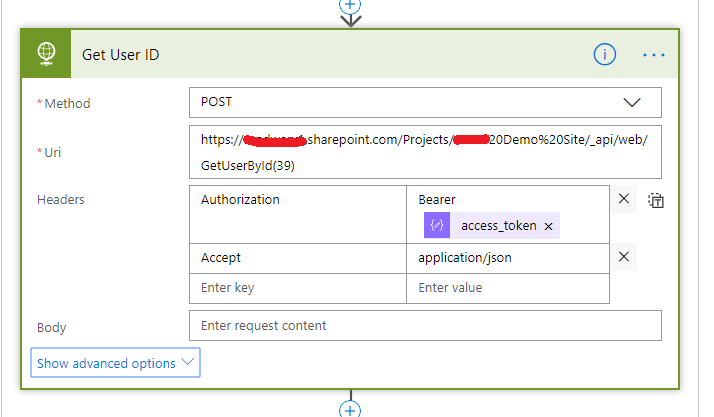
Add one more step of HTTP to get access token as below.
Add Parse JSON step, paste this script under schema
{
"type": "object",
"properties": {
"odata.metadata": {
"type": "string"
},
"odata.type": {
"type": "string"
},
"odata.id": {
"type": "string"
},
"odata.editLink": {
"type": "string"
},
"Id": {
"type": "number"
},
"IsHiddenInUI": {
"type": "boolean"
},
"LoginName": {
"type": "string"
},
"Title": {
"type": "string"
},
"PrincipalType": {
"type": "number"
},
"Email": {
"type": "string"
},
"IsEmailAuthenticationGuestUser": {
"type": "boolean"
},
"IsShareByEmailGuestUser": {
"type": "boolean"
},
"IsSiteAdmin": {
"type": "boolean"
},
"UserId": {
"type": "object",
"properties": {
"NameId": {
"type": "string"
},
"NameIdIssuer": {
"type": "string"
}
}
}
}
}
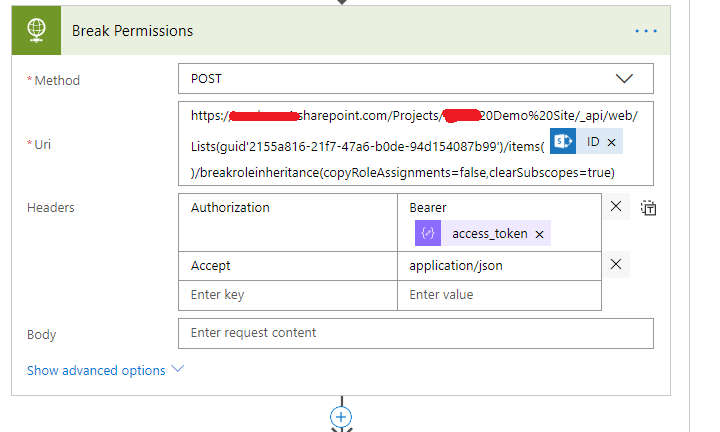
Add HTTP condition for Breaking Permissions.
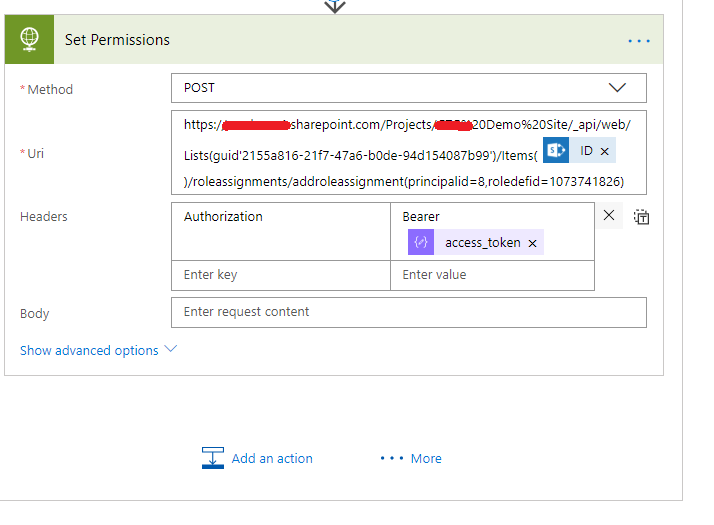
Add another HTTP Condition to set permission.
Permissions level
Role ID
Full Control
1073741829
Contribute
1073741827
Read
1073741826
Thats all save your flow and test the flow. verify your list items permission by selecting the item ECB Menu.
Please feel free to comments if you have any doubts.
Check for “Library and Folder Based Retention” feature under top level site features and activate.
You can enable and add retention stage over List/Library under settings to schedule policy and action over a period of time. for eg, after 30 days of creation date, you can start the workflow to trigger, move to recylcebin, permanently delete the document/list etc.
There are two timer jobs behind the scenes which will run on weekly basis.
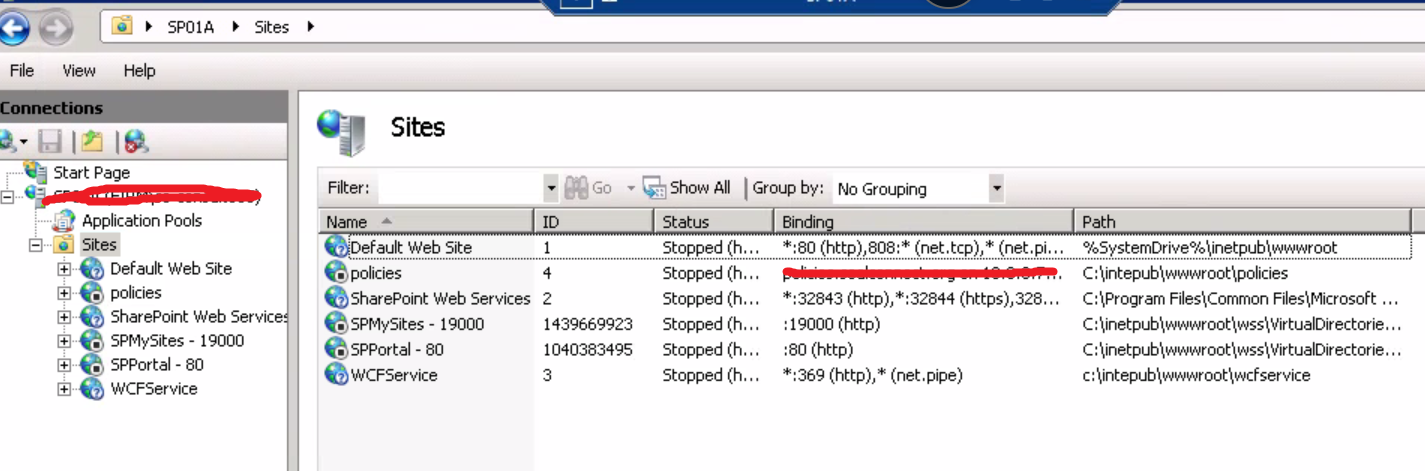
For SharePoint On Premise, restart the below timer jobs to make it working.
Expiration Policy.
Information management policy.
For SPO/SharePoint Online we don’t have control over this timer jobs to restart rather need to wait till timer job executes and no other way and will run weekly mostly Monday or Tuesday and depends on timezone.
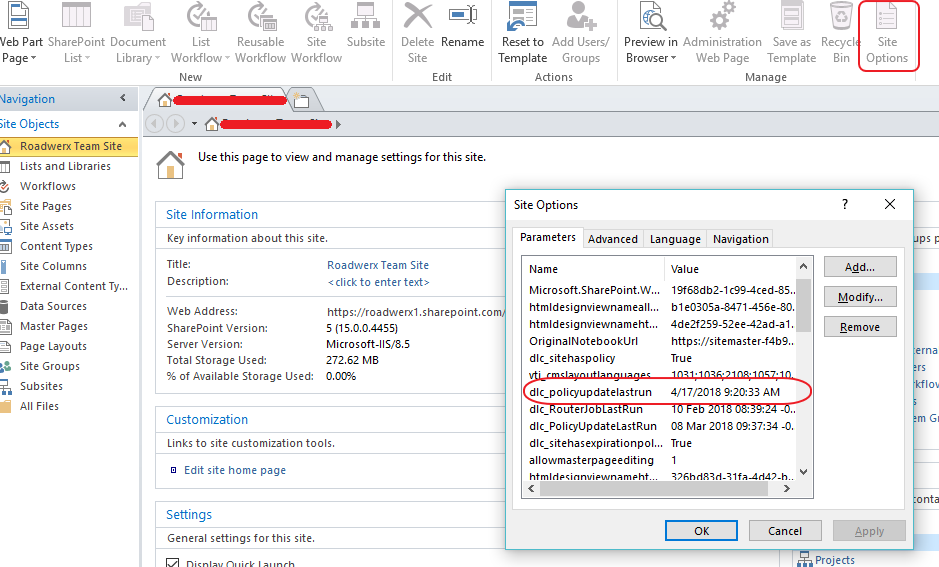
You can check the last execution date of these timer jobs using SharePoint Designer.
Open the root SharePoint Online site and check for dates for the below two properties from top Ribbon Site Options.
I have taken the list template from SharePoint 2007. Edited the Product version in order to use this template in SharePoint Online similar to this.
After creating the list from template, I tried to add edit list items and facing this error saying that column ContentType does not exist. It may have been deleted by another user while adding/updating the list item.
To overcome this,
I have created single line of text column with name “ContentType”.
After which, I’m able to add and edit the list items.


 output to variable requestHeaders.
 output variable to metadata.
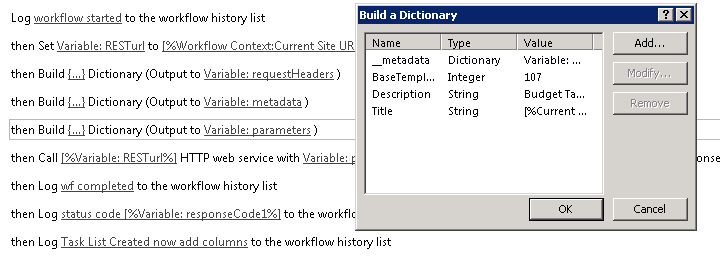 output variable to parameters.


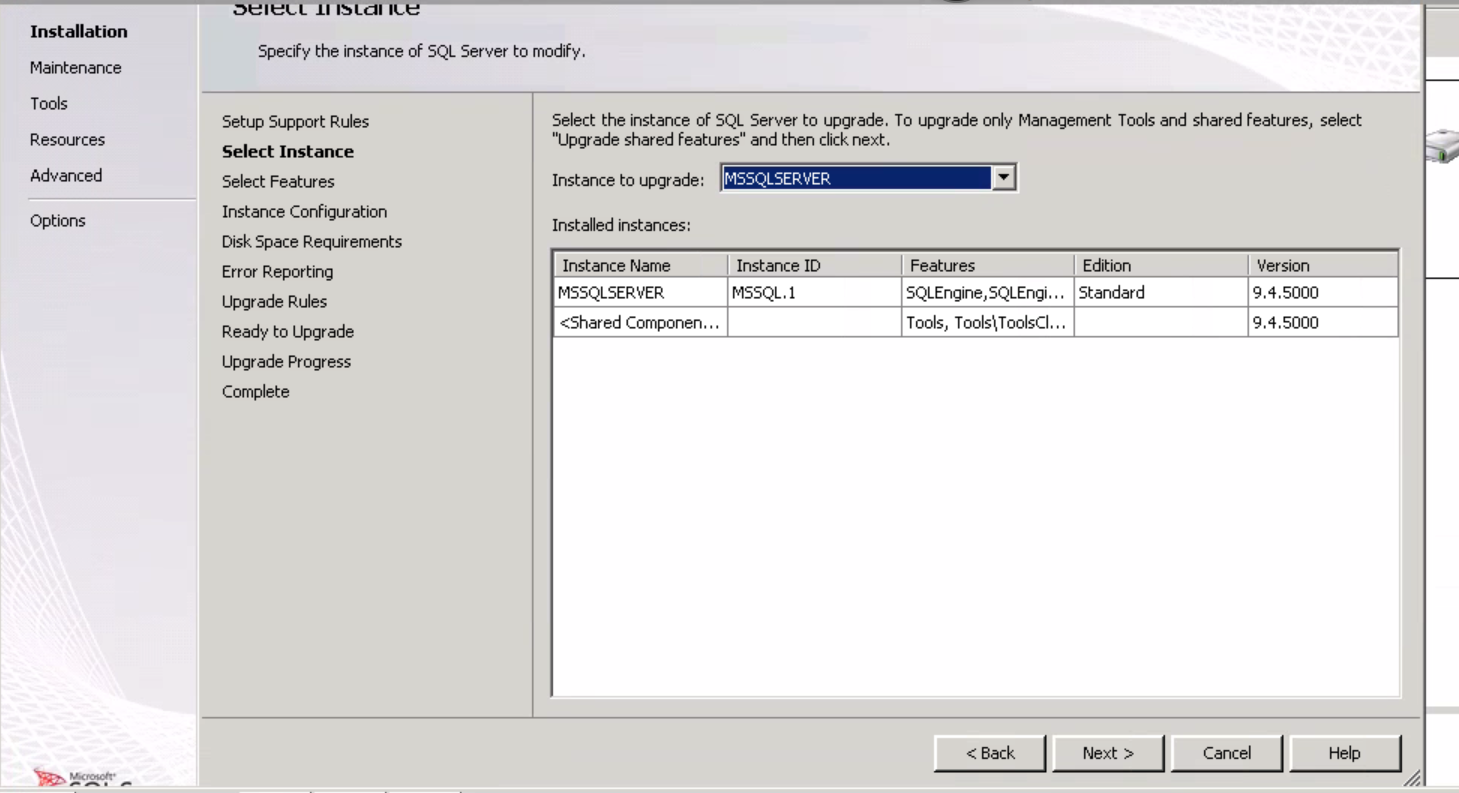
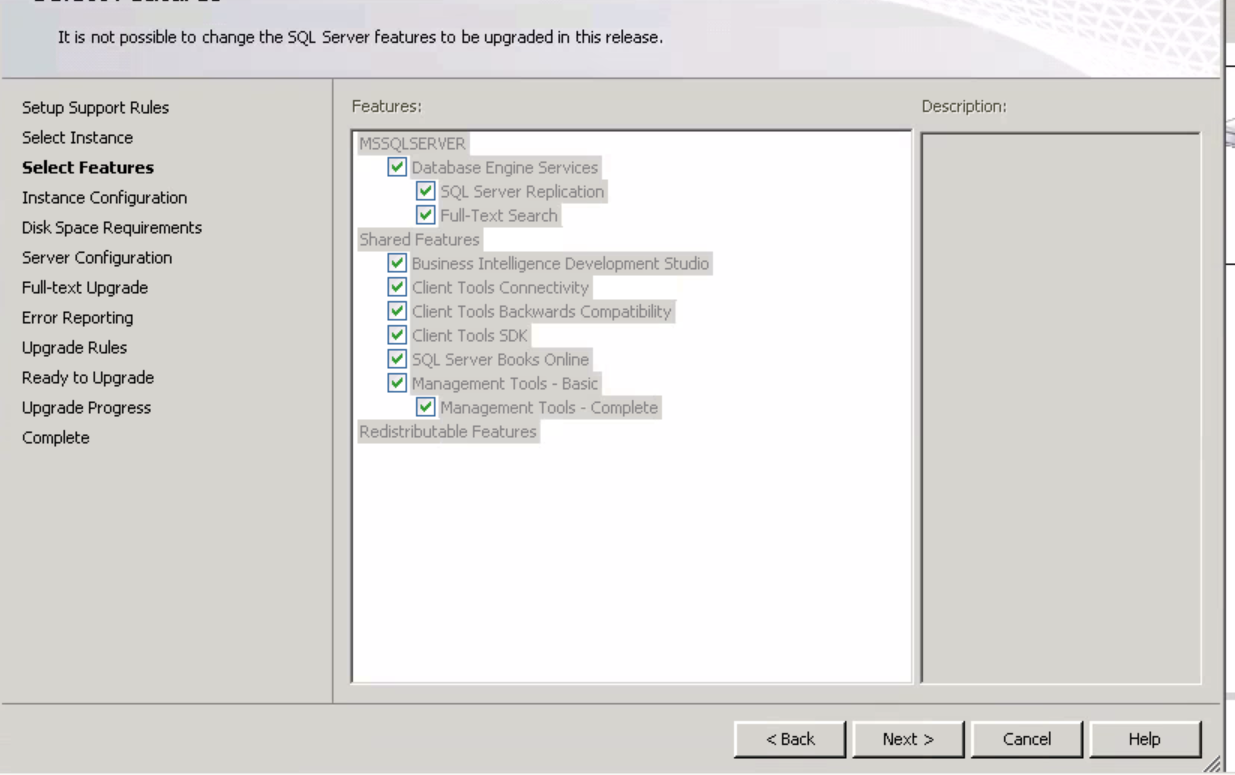
 3. Perform SQL Upgrade from Installation Media.
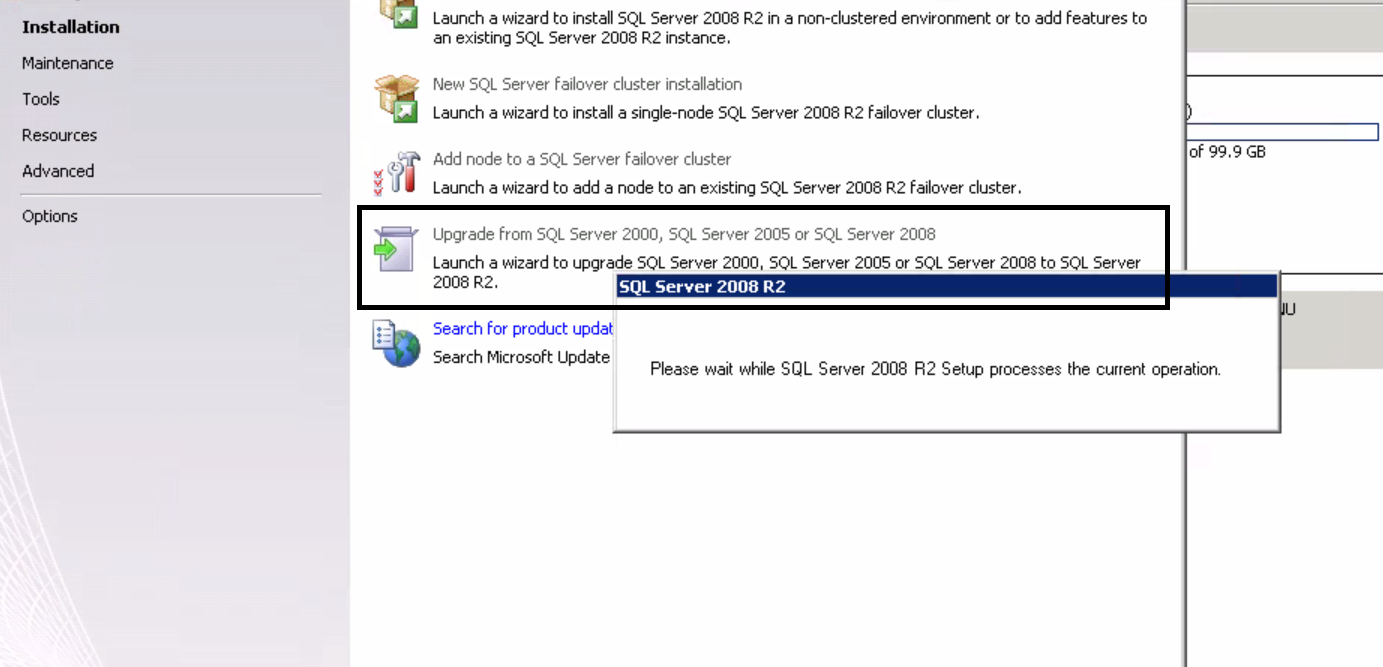

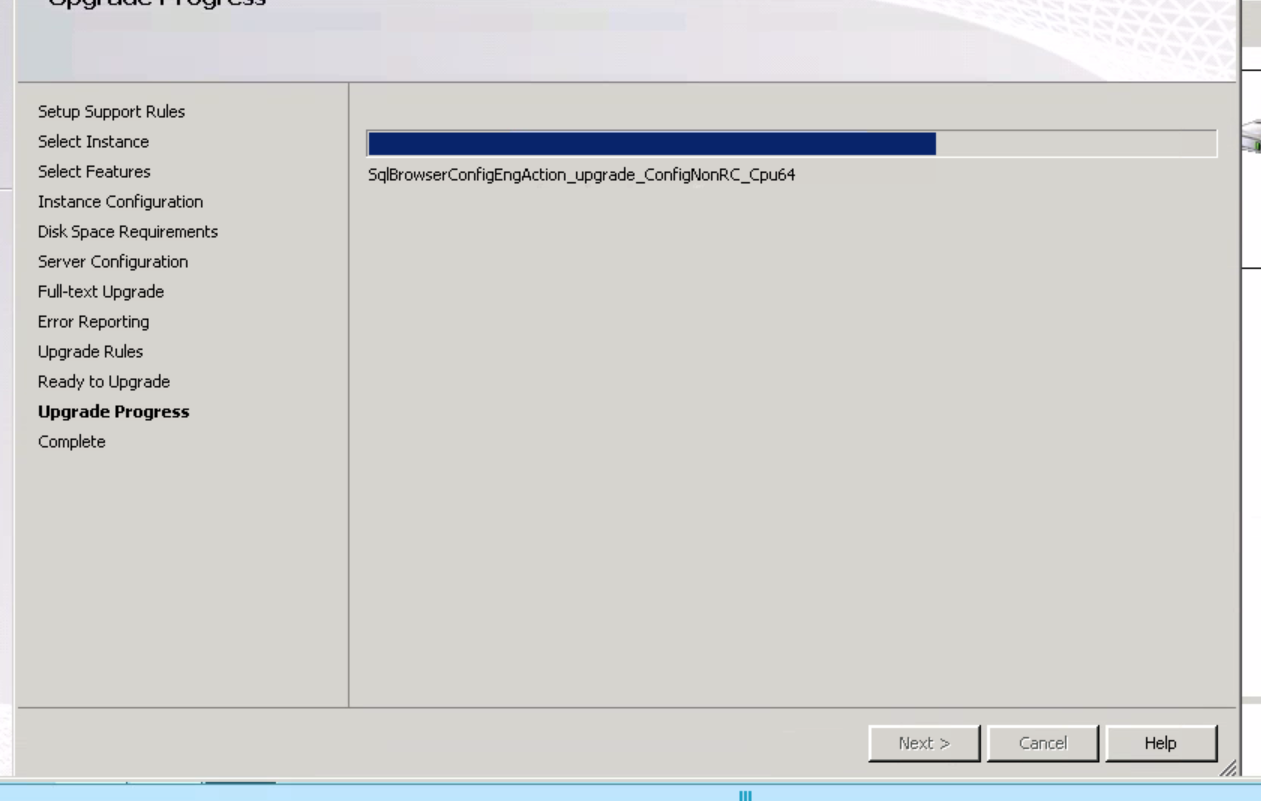
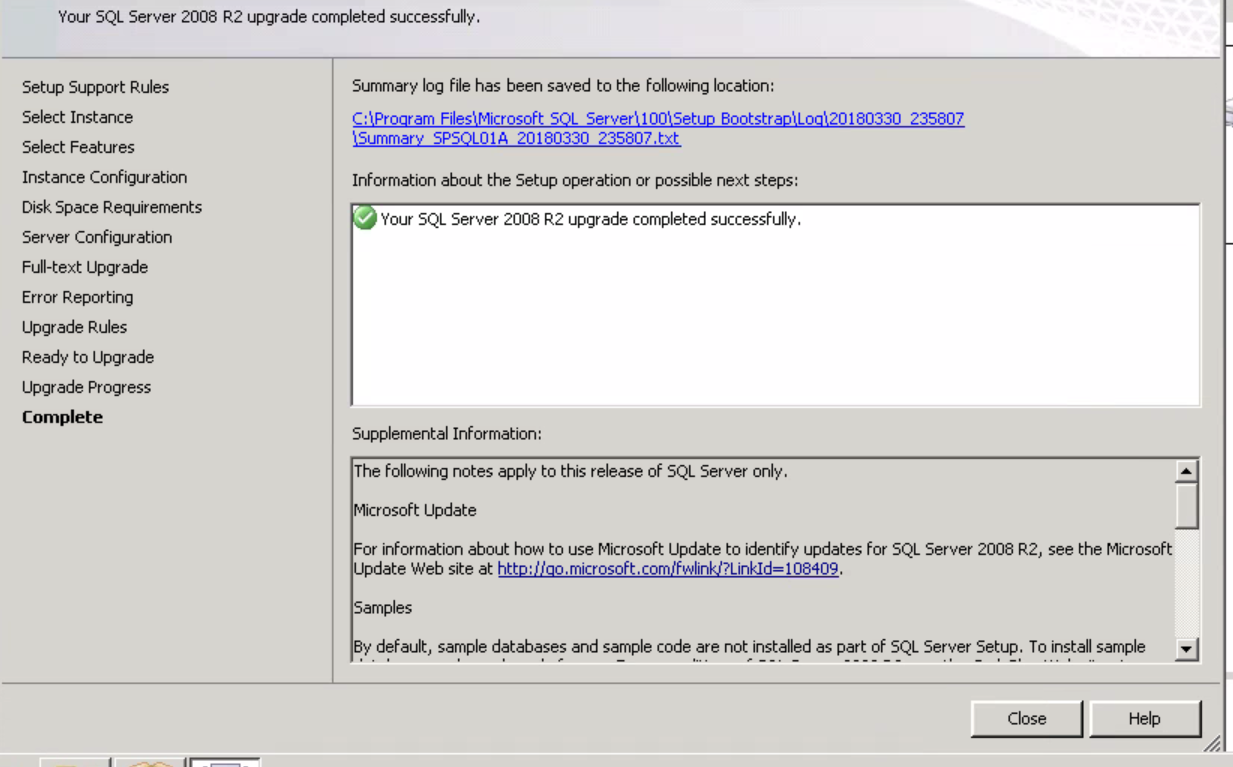

 4. Once Upgrade is complete, start the services and application pools related to SharePoint.