Display List Attachments with names in List view web part

I want to display list item attachment names in Allitems.aspx.

From this:

attach1

to this:

attach2.png

To do this, upload the below two files under site assets.

  1. place the script with name showAttachment.js

(function () {

// Create object that have the context information about the field that we want to change it output render

var attachmentsFiledContext = {};

attachmentsFiledContext.Templates = {};

attachmentsFiledContext.Templates.Fields = {

“Attachments”: { “View”: AttachmentsFiledTemplate }
};

SPClientTemplates.TemplateManager.RegisterTemplateOverrides(attachmentsFiledContext);

})();


// This function provides the rendering logic for list view
function AttachmentsFiledTemplate(ctx) {
var itemId = ctx.CurrentItem.ID;
var listName = ctx.ListTitle;
return getAttachments(listName, itemId);
}

//get attachments field properties
function getAttachments(listName,itemId) {

var url = _spPageContextInfo.webAbsoluteUrl;
var requestUri = url + “/_api/web/lists/getbytitle(‘” + listName + “‘)/items(” + itemId + “)/AttachmentFiles”;
var str = “”;
// execute AJAX request
$.ajax({
url: requestUri,
type: “GET”,
headers: { “ACCEPT”: “application/json;odata=verbose” },
async: false,
success: function (data) {
for (var i = 0; i < data.d.results.length; i++) {
str += “<a href='” + data.d.results[i].ServerRelativeUrl + “‘>” + data.d.results[i].FileName + “</a>”;
if (i != data.d.results.length – 1) {
str += “<br/>”;
}
}
},
error: function (err) {
//alert(err);
}
});
return str;
}

2. and add jquery.js

3. Go to allitems.aspx and edit page add js link reference to ~site/SiteAssets/jquery-1.11.3.min.js|~site/SiteAssets/showAttachments.js

as below

attach3

Thats’it.


Client side People picker in SharePoint

In this post I’m going to show how to use Client side people picker control in SharePoint.

For this I have created custom list with people picker column and enabled allow multiple values.

Added content editor web part linked to html file and added js reference in it.

Here is my list

p1

page view

p2

html

p4.png

js

p3


you can still validate the users to accept one user, multi user as below


//requestor
var requestor = $(“#peoplepickerDiv”).getUserInfo();
var requestorCount = requestor.split(‘;’);
if (requestor == “”) {
isValid = false;
$(peoplepickerDiv_TopSpan).css({
“border”: “1px solid red”
});

alert(“mandatory”);
}
else if (requestorCount.length > 1) {
isValid = false;

$(peoplepickerDiv_TopSpan).css({
“border”: “1px solid red”
});

alert(“Only one user is allowed”);
}
else {
$(peoplepickerDiv_TopSpan).css({
“border”: “”,
“background”: “”
});
}

SharePoint 2013 List CRUD Operations with Angular JS step by step

Today I’m going to show how to perform List operations(CRUD) using Anuglarjs.

I have used Office 365 Site for this demo.

Here are the steps:

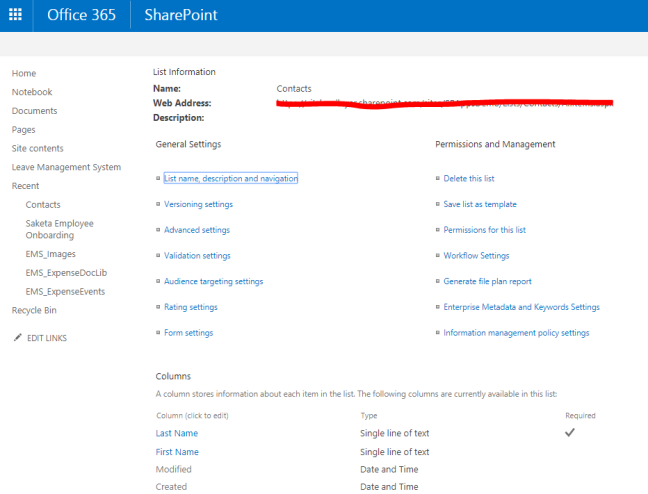
1.Create SharePoint custom List (Contacts) and add columns like this. Renamed Tile as Last Name

Angular1

Angular2

2. Create html page and add below code with name ListItems.html under SiteAssets.

<!DOCTYPE html>

<html lang=”en” xmlns=”http://www.w3.org/1999/xhtml”&gt;
<head>
<meta charset=”utf-8″ />
<title></title>
https://ajax.googleapis.com/ajax/libs/jquery/3.2.1/jquery.min.js
https://ajax.googleapis.com/ajax/libs/angularjs/1.6.4/angular.min.js
/sites/SPAppsDemo/SiteAssets/ListItems.controller.js

<style type=”text/css”>
.Table {
display: table;
}

.Row {
display: table-row;
}

.Cell {
display: table-cell;
padding: 5px;
}
</style>
</head>
<body>
<h3>View Contacts</h3>
<hr />

{{contact.ID}}: {{contact.Title}}, {{contact.FirstName}}

</div>
<hr />


<h3>Add Contacts</h3>

First Name :

</div>

Last Name :

</div>

</div>
</div>
</div>
<hr />


<h3>Edit Contacts</h3>

ID :

</div>

First Name :

</div>

Last Name :

</div>

</div>
</div>
</div>
<hr />


<h3>Delete Contacts</h3>

ID :

</div>

</div>
</div>
</div>
</div>
</body>
</html>”


3. Add below JavaScript code with ListItems.contoller.js under Site Assets.

var spApp = angular
.module(“spApp”, [])
.controller(“viewItemsController”, function ($scope, $http) {
var url = _spPageContextInfo.webAbsoluteUrl + “/_api/web/lists/getByTitle(‘Contacts’)/items?$select=Title,FirstName,ID”;
$http(
{
method: “GET”,
url: url,
headers: { “accept”: “application/json;odata=verbose” }
}
).then(function (data, status, headers, config) {
$scope.contacts = data.data.d.results;
}).catch(function (data, status, headers, config) {
});

})

.controller(“addItemsController”, function ($scope, $http) {
var url = _spPageContextInfo.webAbsoluteUrl + “/_api/web/lists/getByTitle(‘Contacts’)/items”;
var vm = $scope;
vm.addContact = function () {
return $http({
headers: { “Accept”: “application/json; odata=verbose”, “X-RequestDigest”: jQuery(“#__REQUESTDIGEST”).val() },
method: “POST”,
url: url,
data: {
‘Title’: vm.lastName,
‘FirstName’: vm.firstName
}
})
.then(saveContact)
.catch(function (message) {
console.log(“addContact() error: ” + message);
});
function saveContact(data, status, headers, config) {
alert(“Item Added Successfully”);
return data.data.d;
}
}
})

.controller(“editItemsController”, function ($scope, $http) {

var vm = $scope;
vm.editContact = function () {
var data = {
‘__metadata’: {
‘type’: ‘SP.Data.ContactsListItem’
},
‘Title’: vm.lastName,
‘FirstName’: vm.firstName
};
return $http({
headers: {
“Accept”: “application/json; odata=verbose”,
“Content-Type”: “application/json; odata=verbose”,
“X-HTTP-Method”: “MERGE”,
“X-RequestDigest”: document.getElementById(“__REQUESTDIGEST”).value,
“Content-Length”: data.length,
‘IF-MATCH’: “*”
},
method: “POST”,
url: _spPageContextInfo.webAbsoluteUrl + “/_api/web/lists/getByTitle(‘Contacts’)/items(” + vm.itemId + “)”,
data: data
})
.then(saveContact)
.catch(function (message) {
console.log(“editContact() error: ” + message);
});
function saveContact(data, status, headers, config) {
alert(“Item Edited Successfully”);
return data.data.d;
}
}
})

.controller(“delItemsController”, function ($scope, $http) {

var vm = $scope;

vm.delContact = function () {
return $http({
headers: {
“X-HTTP-Method”: “DELETE”,
“X-RequestDigest”: document.getElementById(“__REQUESTDIGEST”).value,
‘IF-MATCH’: “*”
},
method: “POST”,
url: _spPageContextInfo.webAbsoluteUrl + “/_api/web/lists/getByTitle(‘Contacts’)/items(” + vm.itemId + “)”
})
.then(saveContact)
.catch(function (message) {
console.log(“delContact() error: ” + message);
});
function saveContact(data, status, headers, config) {
alert(“Item Deleted Successfully”);
return data.data.d;
}
}
});


4. Create a new Site Page and add Content Editor Web part and link to the above html page.

Angular3

5. Page will be like

Angular4

Angular5

Angular6

For your reference I’m attaching images of code as wordpress rendering some html content

Encrypt/Decrypt appsettings in webconfig file of SharePoint

At times, we need to encrypt app settings  of web config file that we use in code behind to keep information secured.

we can encrypt/decrypt settings by using  the ASP.NET IIS registration tool (aspnet_regiis.exe)

Steps:

Open command prompt window.

Go to the framework path.

cd C:\Windows\Microsoft.NET\Framework\v4.0.30319 by using cd “C:\Windows\Microsoft.NET\Framework\v4.0.30319”

Execute the following command to encrypt the appsetting in webconfig.

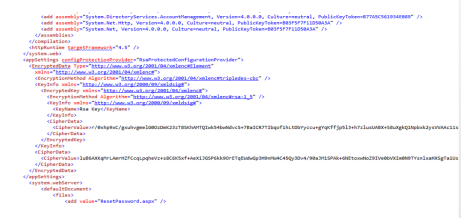
Before encryption:

1

#to encrypt

aspnet_regiis -pef appSettings “C:\inetpub\wwwroot\wss\VirtualDirectories\2039”

After encryption:

2

# to decrypt

aspnet_regiis -pdf appSettings “C:\inetpub\wwwroot\wss\VirtualDirectories\2039”

Note: replace the port number to respective number based on site virtual directory.

Hide or Remove header and footer from SharePoint modal pages

If your SharePoint site has custom master page with header and footer, these will come along through all inner pages, SharePoint default dialog windows/popups in which we may not require those to display.

To hide those header and footer elements in all inner pages, we can use/add a css class to hide them like below.

RemoveHeaderFooter.PNG

That’s it.

before:

before

after:

after